Last night was a bit late for me. Steve and I had our monthly date night to Cabaret. So much fun! And so inspiring! I can't wait to perform on that stage. Someday....
In the meantime, I thought I'd share with you some of the pictures in my cache that I've found over the years. Mostly on google image searches, because there is a treasure trove of cool stuff out there!
Just a quick note, I don't know where all of these images have come from, so please don't reproduce them as your own. But I'm sure taking some inspiration to fuel your own original creations will be allowed.
So first up, I LOVE Victoria Francis! She has amazing images, and they're dark but still so pretty. I love that combination of feminine beauty, and dark hunter/evilness.
Which makes it really hard to choose a favorite.
At the moment, though, I'm going through a bit of a mask phase. I have an idea in my head for a dance troupe called Katcina after the Native American goddess spirits by the same name. I want to do a lot of different forms of belly dance, but to link it all together, use masks in the costumes.
Cool, huh?
Besides the benefit of not having to panic over a bad skin day.
There are some seriously gorgeous masks out there!
Eventually, I want to learn how to make something like that. I'm so in love with it!
This one I found on Deviant Art listed as a bridal mask. What a cool idea! I wish I'd seen something like that before my wedding. I would've been all over it!
Back to belly dancing. The great thing about costumes is that really anything goes. You can fully explore the creative avenues of your mind and stretch your talents to the absolute furthest!
I love the cogs and ribbons. Such an amazing look.
I wish I knew how to get those rivets on there. My NEVER work! I think I need more practice.
There is a surprising lack of GOOD belly dancer art out there. There are a few exceptions, but it seems quite strange since there are plenty of amazing photographs. Why haven't artists done drawings and/or paintings? I've enlisted Steve to help with that.
And these are some of the paintings he's competing with.
COLOR! I love color. I'm a color freak.
This is why I don't get why there isn't more of this subject out there. Not only does it present a perfect opportunity for a full color palette, but it is such a celebration of the female form!
I want that one as a print. Stunning. Truly stunning.
Looks good in black and white, too. This is Steve's first attempt. Simple pencil portrait of one of my teachers and inspirations.
The colors in the original photo are wonderful- deep red and pure white with touches of gold- but the simplified image with just pencil really showcases the emotive ability of the human face.
And just to finish off, so you know that I'm not serious all the time....
Because sometimes you need a couple living dead to lighten the mood.
So what inspires you?
Saturday, April 30, 2011
Friday, April 29, 2011
Spiral bound
Psst!
Over here.
No, not there. Here! Yeah, hi. I feel that we've grown very close over the last few weeks, so I want to let you in on a little secret. But first, you have to verify your identity with our secret handshake.
What do you mean we don't have a secret handshake? We should definitely have a secret handshake. Oh well, I'll just add it to my to do list. Which means I should be able to get to it in, oh, I don't know, 4 or 5 years!
I'll share with you anyway.
This bracelet is ridiculously easy to create.
Now, I wish I could take credit for this technique because it's such an incredible method for creating this complicated look, without the complications of... stuff.
Sorry, school holidays really take their toll on my brain function.
Anyway, I learned this technique from a great book called "Simple Glass Beading" by Dorothy Wood. It has a lot of fabulous projects in it, and has been an invaluable reference tool for me over the years.
To begin, pick out your beads. You'll need 3 colors. In the bracelet pictured above, I used seed beads in 3 colors, but all the same size. This time, I'm using seed beads in purple and turquoise with miracle beads in a light blue-green.
I love miracle beads!
First, string 4 of your interior beads (in my case purple), 1 exterior seed bead (turquoise), 1 miracle bead (LOVE MIRACLE BEADS!), and 1 more exterior seed bead.
Let the whole lot drop down your thread, but be sure to leave an extra long tail. You'll use it to attach your fastener later on.
Now, take your needle back through the interior beads (purple).
Kinda looks like 2 rows. Or a loop depending on the sizes of beads you're using.
Now, thread on 1 interior (purple), 1 exterior (turquoise), 1 miracle, and 1 more exterior.
Let the beads drop to the cluster towards the bottom of the thread.
Now, thread your needle through the last 3 interior (purple) beads from the cluster AND the 4th bead you just added. Pull the thread firmly.
And repeat.
Over and over. (Like crimson and clover.)
Always threading your needle through the last 3 interior (purple) beads on your work, AND the 4th bead just added.
Very soon it starts to look like this.
What appears to be a spiral is actually just a series of loops arranged together.
Have I mentioned that I love miracle beads? Yes? Good. Because I really love miracle beads! And here's why. That's NOT trick photography or weird lighting. That's actually how they look! Stunning.
This technique goes super fast! After about 2 hours (including countless interruptions), I had this. One of the things you have to keep in mind with this method is to keep measuring the length. Because it's so quick to do, it's very easy to make the piece too big. Not that it's hard to remove some beads, but that is a pain.
Not in method, just in principle.
And this is where I had to stop since I couldn't locate the fastener I wanted.
So, in the midst of my outings with my son yesterday, I stopped at the craft store and got some more toggle clasps since someone must have taken all mine since my organizational standards are so high there's no way that it could have been misplaced.
Right.
Ahem. Moving on.
Using the tails of thread, sew on the fastener of choice.
I tend to over do it a bit since I want to make it as strong as possible. I'm pretty hard on bracelets, so I make them strong enough to deal with me.
I'm hoping no one is harder on them than I am!
And here's the finished bracelet.
Sorry to disappoint, but this one's not going up on Etsy. (Collective sigh received and appreciated.) But dry your eyes, I will be doing more (since I now have more toggles), and will list them asap.
Thursday, April 28, 2011
Raise your banners high!
I hate to admit defeat, especially when it's against inanimate objects such as computers- although I'm not altogether sure about the inanimate part, I swear they're planning the ultimate coup against humanity.
Don't make any sudden moves.
Anyway, I decided to revisit the task of creating a banner for my Etsy shop in the hopes that this time I would rise victorious.
Personally, I'm a fan of Photoshop. It's an amazing tool, and you can do some really cool stuff with it. Unfortunately, you have to mortgage your house in order to buy a copy.
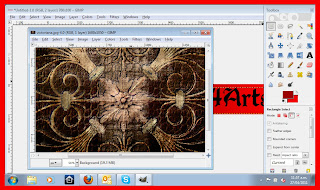
So I use a free program called Gimp. Get your copy here. It's a lot like Photoshop, but less predictive. Good news if you get upset with programs that say, "It looks like you're trying to do blah, here I'll do it for you," (I hate that paperclip guy), not so good news if you get irritated with yourself for not being able to just MAKE THE STUPID THING WORK!!
So we start simply by opening a new image, 760 pixels wide by 100 pixels high (because that's what Etsy says it needs to be). I set the resolution at 150 pixels per inch simply because that seems like a nice number.
I also like gradients, so, select the colors you want, select the gradient tool, and ...
Voila! There's lots of settings and stuff in there you can play with until you get it looking just how you want.
Of course, you need the name of the shop. Selecting the text tool will open the dialogue box where you type what you want the text to say. In my case "Batty4Arts" since that's the name of the shop.
Putting the name of your shop on your banner. Stroke of genius!
You can also play around with the font styles, size, color, etc. I get most of my fonts from DaFont. They have tons of free use fonts on there that are so much fun. I can spend hours, days, weeks... you get the picture, downloading fonts just because.
So this is the banner. Kinda boring.
Needs something. Like a rose! A black rose. What do I have in my image library that I can use?
It's not a black rose, but it's seriously kick azz!
It's also far too big.
First step, scale the image.
I'm keeping the proportions, just scaling the width to 760 pixels. I can crop the image later.
Changing the aspect ratio works for some things, but always keep in mind it will distort the image. The bigger the change, the more distortion.
Then, using the select tool, I selected a rectangle that was 100 pixels high. This is why I typically have the rulers showing.
And then drag the rectangle to select the part of the image I want. (Sorry this is so hard to see, I'll have to keep this in mind if I do something like this again.)
Control-C to copy. Always use keyboard shortcut keys.
Now, going back to my banner. Under the Layer drop down, I select "Previous Layer." That would be the layer under the text. The one with the gradient.
Control-V to paste.
Can't read what it says? Wait for it.
Adjust the hue, saturation, and lightness of the layer in the color menu.
Until it looks the way you want it to.
And the finished product on my Etsy Shop.
It's still not as much as I'd like, but it's a start. I'm sure to play around with it the more I go. And of course, it will have to change for the holidays!
Wednesday, April 27, 2011
Another day in paradise
This morning, after days of rain during the school holidays with 3 children feeling homicidal from the effects of cabin fever, I awoke to glorious sun streaming in through the window. The warmth on my face was like the kiss of angels. And my first thought was, "Finally! I can do laundry and hang it out to dry!" Which is a really depressing thought. The first sign of sun in days and I think about doing laundry? Ugh.
Even more depressing when I actually woke up and it was pouring down rain, harder than yesterday, and freezing, colder than yesterday. Apparently the land of the eternal grey cloud is being engulfed by the first true winter storm of the year. And I'm dreaming about hanging out laundry.
This wasn't quite how I pictured life when I was a teenager.
Anyway, the ongoing adventure of setting up my Etsy shop continued with designing a banner. My idea was to share with you how to use a fabulous program called Gimp to do this.
And then I remembered that my computer hates me. After an hour of cursing the machine for being the stubborn whore that it is, I gave up. Well, not exactly "gave up." I'm way too stubborn for that. I'm just cultivating a plan. Giving it time to...uh....er....age to perfection. And for Bobbi Sue (that's my computer) to get her CPU on straight and remember that I'M THE ONE IN CHARGE HERE!
In the meantime, I did a simple beaded bracelet to remind myself how amazing I really am.
Turns out, this may not be the best organizational method for jewelry components.
I know, weird right?
So, through no fault of my own, because I'm awesome dammit! My toggle clasps are hiding from me. When they decide to stop being silly, I'll be able to finish said gorgeous bracelet.
Moving on.
I bid a fond farewell to Samantha the other day. Some visitors came over, fell in love with her, and offered $100. I wasn't going to sell her, but I could tell they really liked her, so, she's off gallivanting around the country now.
Which means I need to make myself a new guardian for my car.
This time she'll have a black and red theme since that's the colors of my car.
Also, this time, I don't want the pain of trying to reattach her head! So as I pulled out her hair, I was very careful, only pulling out small amounts at a time to avoid tearing the rubber, and dislodging her skull.
It was difficult since it was quite hard to take out my frustrations on her.
It also takes a bit longer than simply ripping it out.
And gave me blisters.
But in the end it was worth it and now I can...
What do you mean "What blisters?" It's right there! HUGE! And painful.
Look! There! See?
Huh.
Well, it hurts.
A bit.
You know what, it's pouring rain and I still have 5 days to survive with bored kids. And there's no more chocolate left in the house. I need awine whine sometimes.
Although, at the moment, the wee boy is watching Animaniacs downstairs. I think I'll go join him.
Even more depressing when I actually woke up and it was pouring down rain, harder than yesterday, and freezing, colder than yesterday. Apparently the land of the eternal grey cloud is being engulfed by the first true winter storm of the year. And I'm dreaming about hanging out laundry.
This wasn't quite how I pictured life when I was a teenager.
Anyway, the ongoing adventure of setting up my Etsy shop continued with designing a banner. My idea was to share with you how to use a fabulous program called Gimp to do this.
And then I remembered that my computer hates me. After an hour of cursing the machine for being the stubborn whore that it is, I gave up. Well, not exactly "gave up." I'm way too stubborn for that. I'm just cultivating a plan. Giving it time to...uh....er....age to perfection. And for Bobbi Sue (that's my computer) to get her CPU on straight and remember that I'M THE ONE IN CHARGE HERE!
In the meantime, I did a simple beaded bracelet to remind myself how amazing I really am.
Turns out, this may not be the best organizational method for jewelry components.
I know, weird right?
So, through no fault of my own, because I'm awesome dammit! My toggle clasps are hiding from me. When they decide to stop being silly, I'll be able to finish said gorgeous bracelet.
Moving on.
I bid a fond farewell to Samantha the other day. Some visitors came over, fell in love with her, and offered $100. I wasn't going to sell her, but I could tell they really liked her, so, she's off gallivanting around the country now.
Which means I need to make myself a new guardian for my car.
This time she'll have a black and red theme since that's the colors of my car.
Also, this time, I don't want the pain of trying to reattach her head! So as I pulled out her hair, I was very careful, only pulling out small amounts at a time to avoid tearing the rubber, and dislodging her skull.
It was difficult since it was quite hard to take out my frustrations on her.
It also takes a bit longer than simply ripping it out.
And gave me blisters.
But in the end it was worth it and now I can...
What do you mean "What blisters?" It's right there! HUGE! And painful.
Look! There! See?
Huh.
Well, it hurts.
A bit.
You know what, it's pouring rain and I still have 5 days to survive with bored kids. And there's no more chocolate left in the house. I need a
Although, at the moment, the wee boy is watching Animaniacs downstairs. I think I'll go join him.
Tuesday, April 26, 2011
Beaded Beauty- Part 2
Spring flowers are an excellent way to combat the gray, windy, COLD storm we're having at the moment. This morning, while decided what to wear for the day, I had to choose between bright colors to combat the gloom, or black and gray to reflect it. At the moment I'm wearing gray. My big fuzzy gray robe to combat the cold that has permeated the air.
I still haven't decided what to wear in public.
But that's the beauty of working at home. I don't have to decide until after the coffee and warm shower has kicked in!
The other beauty of working at home is not having to commute in this weather! For all of you who are not as lucky and do have to brave the storm (and other drivers) to get to work, please be careful! I want all of my fans nice and healthy.
Continuing with the bracelet, I added a pink flower to the purple one, as well as the rest of the leaves.
Now it's time for finishing!
Take the needle and thread back through the previous row (not the last one, the one before it), to a point where you want the fastener to be. For this, I wanted the middle 7 beads, or 8 threads.
Weave a few more rows only using these inside strands.
You can weave the thread back and forth a few times after the last row to help hold the beads in place, but I find this step not only not necessary, but kind of a pain as well!
After you've done one end, wind the bracelet back so you can work on the starting end and add the same skinny piece to that end as well. Helps if you make sure to leave some space at the beginning of the bracelet. Note to self.
Or if you're like me and didn't leave much room. Get creative. I actually tied a string through the beginning knot, used that to attach the end to the loom, and that gave me enough space to finish.
But not enough to weave the ends back through the bracelet to hide the knots. I used clear nail polish to secure the knots (those babies aren't going anywhere!), and trimmed the thread close.
It looks fine.
On one end I attached a large faceted bead to act as a toggle.
When I got these they came in a mix and I thought, "When am I ever going to use those?" Just goes to show, you never know when something's going to come in handy.
That's handy.
The other end of the bracelet has a loop of beads just big enough to fit over the decorative bead. I went through both ends about 3 times with my needle and thread to make it as strong as possible. Don't want someone to be putting it on or taking it off and the whole thing to snap! That would be tragic.
And the finished piece. Perfect to chase away the gloomy clouds, or celebrate the perfect spring day!
This has been listed on my Etsy Shop, so go there now to buy it before anyone else does!
I've also got Steve hard at work coming up with more designs. If you'd like to see something in particular, let me know in the comments!
Subscribe to:
Posts (Atom)