Wednesday, April 6, 2011

Doll: Part 7 of hopefully 8

I should have finished her today. This post is supposed to talk about how to finish the hair and do all those little finishing details that really make the doll special.

Instead, I'm ready to paint her red (would match the blood), add horns, and call her extremely rude names until I feel better.

It's just been one of those days. And it started before I even had my coffee when one of my chickens made a break for freedom and it took half an hour to catch her!

Things started to look up, marginally, however when I got to work.  I made the loops of the hair quite long because it had to go through the other part of the head next, and I knew I would need some room to maneuver.

I've decided that before I start another project like this, I'm buying stock in band-aid. I now have the Bat Mobile on my index finger, the Mystery Machine on my middle finger, and several random holes seeping blood in other parts of my hands that I can't really bandage. And I've ceased to care.

Did you ever see the episode of The Twilight Zone with the evil doll? "My name is Sally, and I don't like you." Yeah. Periwinkle is definitely taking on that sort of sinister personality.
Oh look! I'm almost done with this part of the process. Celebratory picture!
It kind of looks like a sea anemone.
And then I begun the process of pushing the loops through the other part of the head. This is about when I realized this was going to be a lot more difficult than I had expected. So, I took a break to get something to eat and hang out laundry while I mulled over my conundrum.

Thinking I had solved the issue, I dove back into it, and very quickly realized that my original method was the most effective.
So I continued.
And continued.

That's an awful lot of hair!

But I finally got it all in and was ready to start tying it together, thereby securing the head in place. And it went really well.

Until I realized the edges weren't lining up properly.

I tried a few things to try to fix the problem, but nothing was working.

It was starting to turn violent. Harsh words were spoken, feelings hurt. We agreed to take a break in our relationship until we're better able to speak to one another without yelling.
Or me beating her head against a hard surface.

In the meantime, I learned another of one of life's greatest lessons today: If you happen to spill hundreds of tiny seed beads onto a polished wooden floor, and if you're lucky enough to collect most of them, do not, under any circumstances, sneeze.
And I picked up a future project from a lady today. This very loved doll will be getting a make over and new life.

Eventually.

Tuesday, April 5, 2011

Doll: Part 6 of however many it takes to finish her

I was sure this was going to be the last installment of this doll. But alas, there will be at least one more.

Part of the reason is that I've been distracted by other things today, the other has been injury.

While working on the beading for Periwinkle's necklace, I was reminded how much I enjoy bead work. And so, I've had a few ideas for projects running rampant through my mind. Steve has forbidden me, however, to begin any more projects until I finish a few of the ones already begun. But, I can't shake the desire to do more beading. The problem is, the mixed bead colors are aggravating my OCD inclinations. So this is what began innocently enough this morning. I've now realized how large a job it is to sort thousands of tiny beads into individual containers. Work in progress.

 You'll be happy to know that I have done more work on the hair.

A relatively small problem of some of the glue giving way as I inserted yarn suddenly became slightly more pronounced about half way through the job when the head once again separated. Fine, be that way.

It was, of course, entirely planned, because this way you can see what the inside of the head looks like with the hair inserted. Note the obvious lack of brain. I'm assuming this means she's a teenager.

Oh no! An ageist remark. I severely apologize to all teenagers with brains. In fact, I'll do so in person. Shouldn't take long. (This is what I believe you call satire.)

Moving on. The photo above shows the sharp pokey thing in action. Oh yeah, action shots!

I've made a row of holes along the edge of the top of the head. Then, with my white wax pencil, I made little lines on the base of the head to coincide with the holes. My idea is to tie the 2 pieces together with the yarn after reapplying glue, to hopefully add a little more strength to the scalp.

I now say a small prayer, and begin making the second row of holes. If it works, I'm awesome. If it doesn't... it doesn't really have a choice since I refuse to admit defeat.
 While making the row of holes, I also make a few holes in her ears to insert jewelry. I LOVE jewelry.

I got all the holes made, then started sorting some more beads. This is called procrastination. All my high and mighty talk about just beginning, starting is the hardest part, blah blah blah... right out the window! Fear of it not working led to a wee bit of procrastination.

So, I pulled up my big girl undies, told myself to stop being silly, and that's about when disaster struck.

First strand of yarn went in. Cool.

Second strand:


You know, when you stab yourself in the knuckle, it bleeds a lot.

I mean a LOT!

So Scooby Doo and the Gang are staunching the blood flow in the Mystery Machine. And I got straight back to work.

And stuck the needle into my thumb.

Call my superstitious, but I think that 2 bleeding injuries with one strand of yarn should be taken as a sign that you need to take a break. The cat agrees. She's curled up with me preventing in further work. Unless I want cat claws dug into my leg. Which I don't.

Here's to more progress tomorrow!

Monday, April 4, 2011

Doll: Part 5 of however many it takes to finish her

Now that my hands are cramped, my fingers are bleeding, and my eyes are permanently crossed, I can see the light at the end of the tunnel!

I thought about how to finish the beading for hours upon hours. But, as usually happens, I didn't come up with anything until I got started. Sometimes you just have to DO. Thinking, planning, talking about it... it all means nothing until you actually begin. So, let's jump in head first (excuse the pun).

 I have no idea what kind of beading thread I'm using. I know that's horrible, but we've got 3 kids, a dog, a cat, 5 chickens, hundreds of fish, and a mortgage. Beading thread is not high on my list of things to research. If you're interested, however, there are a lot of choices out there for you to pick from, and I'm sure you can find help at your local beading supply shop.

This particular thread is actually comprised of lots of little ends and from time to time the end becomes frayed and is difficult to thread onto the needle (I may need to count how many times I've used "thread" in this post!). There are ways around that. You can, for example, snip the tatty end off the thread, but that won't necessarily fix the problem as now you have a new tatty end. You can by a block of bees wax to run your thread through. That is very effective, but it can overly stiffen some types of thread, and you could live in an area like me that when you go into your local craft shop and ask for a block of bees wax they look at you as though you've just started speaking Aramaic. My solution? Chap stick. Put on some chap stick, run the frayed end of the thread through your lips, and voila! Plus, your lips will be healthy and nourished.

So here are some progress shots of the bead work. I'm not sure how many beads are there. I worked in counts of 25 and 10s (some have 30, some have 50, some have 25). The trick is to eyeball what looks right, but have a good enough count that you can replicate it on the other side. 
 I decided I wanted something that looked like beaded drapey sleeves. I think I saw something similar in the Chicago movie.
 This isn't at all what I pictured!

But it works.
 The finished product of the bead work. I could do more. Oh yes. I could create a mat of beads to cover every inch of her! But, there is such a thing as too much. It's the same concept as when I chose her eyes, I don't want to detract from the overall design, but rather enhance it.

I sound so artsy. Do me a favor. Read that last sentence with a fake British accent. You know the one. Like when you go into a gallery and everything they're selling is crap but they're charging millions for it. Read the sentence the way the employees of that gallery talk.
 Ahh...totally lost where I was taking that for a second.

Moving on to hair!

I don't really like doing hair. It's painful. But here are my 3 tools for the job. A thimble, a pokey thing Steve made, and a modified needle.

That's the end of the needle where the eye (the hole you put thread through) usually is. The end popped off when I was trying to work out the logistics of hair with my last doll, Samantha.

So pretty.

Anyway, it's exactly what I need to put the hair into the head. Also, it's a darning needle, so the point isn't really so much of a point as a rounded blunt end.

Still puts a hole in your thumb through a leather thimble when pushing through a plastic doll's head. I found that out the hard way with Samantha. So this time, I'm using a metal thimble, and I urge you to do the same! Learn from my mistakes people!

So this is the yarn I'll be using for hair. Confession: this whole doll revolves around this hair. I saw it in my drawer while I was working on Samantha, and thought it would be awesome hair. Just not for Samantha.

To measure the hair, hold one end of the yarn where you'll be pushing it in. Measure how long you want the hair to be. Add a couple inches- remember, you can cut it later if it's too long, but if it's too short you're kind of up the creek, if you know what I mean. No? Too bad, keep going.

Now, double that length of thread and cut. Find the middle of the thread, push onto your modified needle, and hold tightly enough that it doesn't just flop out again. With your nifty sharp pokey thing, or ice pick, Make a hole big enough to push the yarn through. It should be pretty tight, which is why you have the thimble. The tightness is what holds the yarn in!

Now, I've discovered that the act of pushing the pokey thing in, has rendered the step of gluing the head together completely useless. I'll figure something else out eventually. That's one of the joys of crafting. Coming up with creative solutions to problems you had no idea you'd run into. Ever. Trust me. Enjoy it. If you don't, you won't enjoy crafting. It's a huge part of the process.

Remember how I marked where the zig zag was going to be on her head? Of course you do. I'm following those lines to begin with, mainly because it gives me a starting point. Sometimes starting is the hardest part, but you've got to do it sometime.

I'm also being quite sparse with her hair. I've only got one skein of this yarn, and since I bought it a few years ago, I can't get anymore. And I've learned that means that if I go all out now, I'll run out of hair part way through. This way I probably won't, just because that's the way it seems to go. But if I do, it'll will be easier to add another color and make it look like that's what I meant to do all along!

So this is where she's up to. I'm going to keep going with her hair, and hopefully she's almost done.

I tried to count how many times I used "thread," but got bored. If you count up how many times "thread" appears, I may be able to send you a goody of some sort. I'll try to work that out.

Sunday, April 3, 2011

Doll: Part 4 of however many it takes to finish her

Today, we're still beading. Just because it's easy once you get the hang of it, doesn't mean it's speedy. Threading individual beads into a woven pattern is time consuming, but the effort pays off eventually.

 One quite important thing to note, and I probably should have said something sooner, is that this is one activity you don't want to start if you don't have a lot of thread! When you've still got several inches of thread, say 6 or so, it's time to tie off. The reason for this is that you have to weave through a few beads after tying off in order to hide the tail.

Tie your knot around the thread in between beads so that it helps to disguise it. You can also dab a bit of clear nail polish or craft glue on the knot to help secure it. For this project, I'm skipping that step simply because there shouldn't be any load on the beading, and quite frankly, the knots are pretty secure anyway.

 Just a quick reminder, too, that at the start of every row, you have to go through the bead from the previous row and the first bead of the current row in order to begin on the next row.
 In this picture ----->
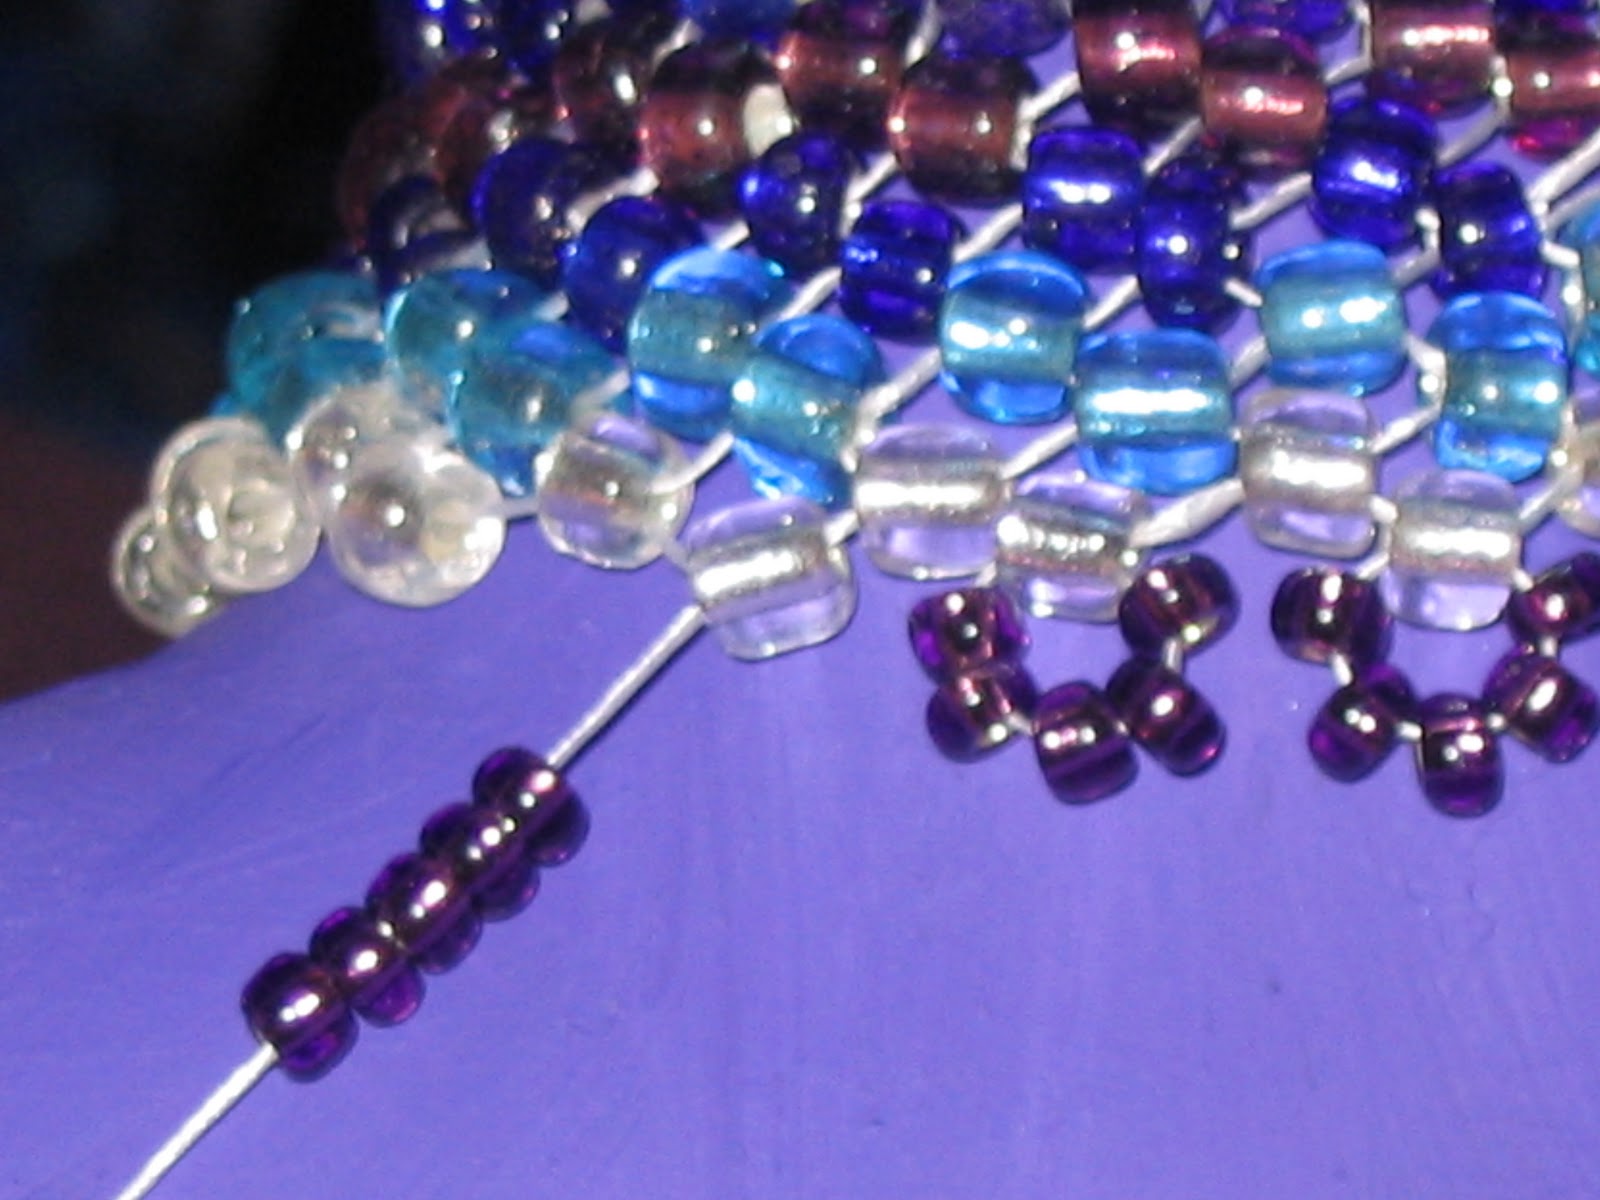
The previous row is light blue, the current row is dark blue, and not pictured- the next row is also dark blue. Not sure if that helps, but hopefully you'll work it out.

I had a sudden realization while working on this today that whereas I don't really have a favorite color, I do have strong preferences for combinations of colors. Quite probably, everyone feels the same, though there may be certain differing opinions on what colors look good together. Though, since I've never run a full study on the human psyche and how color combinations influence personalities, I really can't tell you if there is in fact a correlation to color preferences and, say, psychopathic tendencies. But I would not be surprised in the least.

For instance, I'm quite drawn to both these combinations. Light blue, dark blue, purple and white has a very cool feeling to it. On the other hand, gold, green, red, and white is very warm. And although I do admit that the latter is very much Christmas colors, I'm currently in the mind of fall since, here in the southern hemisphere it is autumn, but no where to my knowledge is it Christmas.

Oh look, pretty foliage.
 My point, though poorly made, is this is how the mixture came. All the colors together. To me this is too much. It's jumbled, busy, and I just don't know where to look! The colors are competing against one another instead of working together to showcase their individual strengths.

I apologise, I'm listening to deep and meaningful music to try to drown out the sound of electronic warfare coming from the other room.

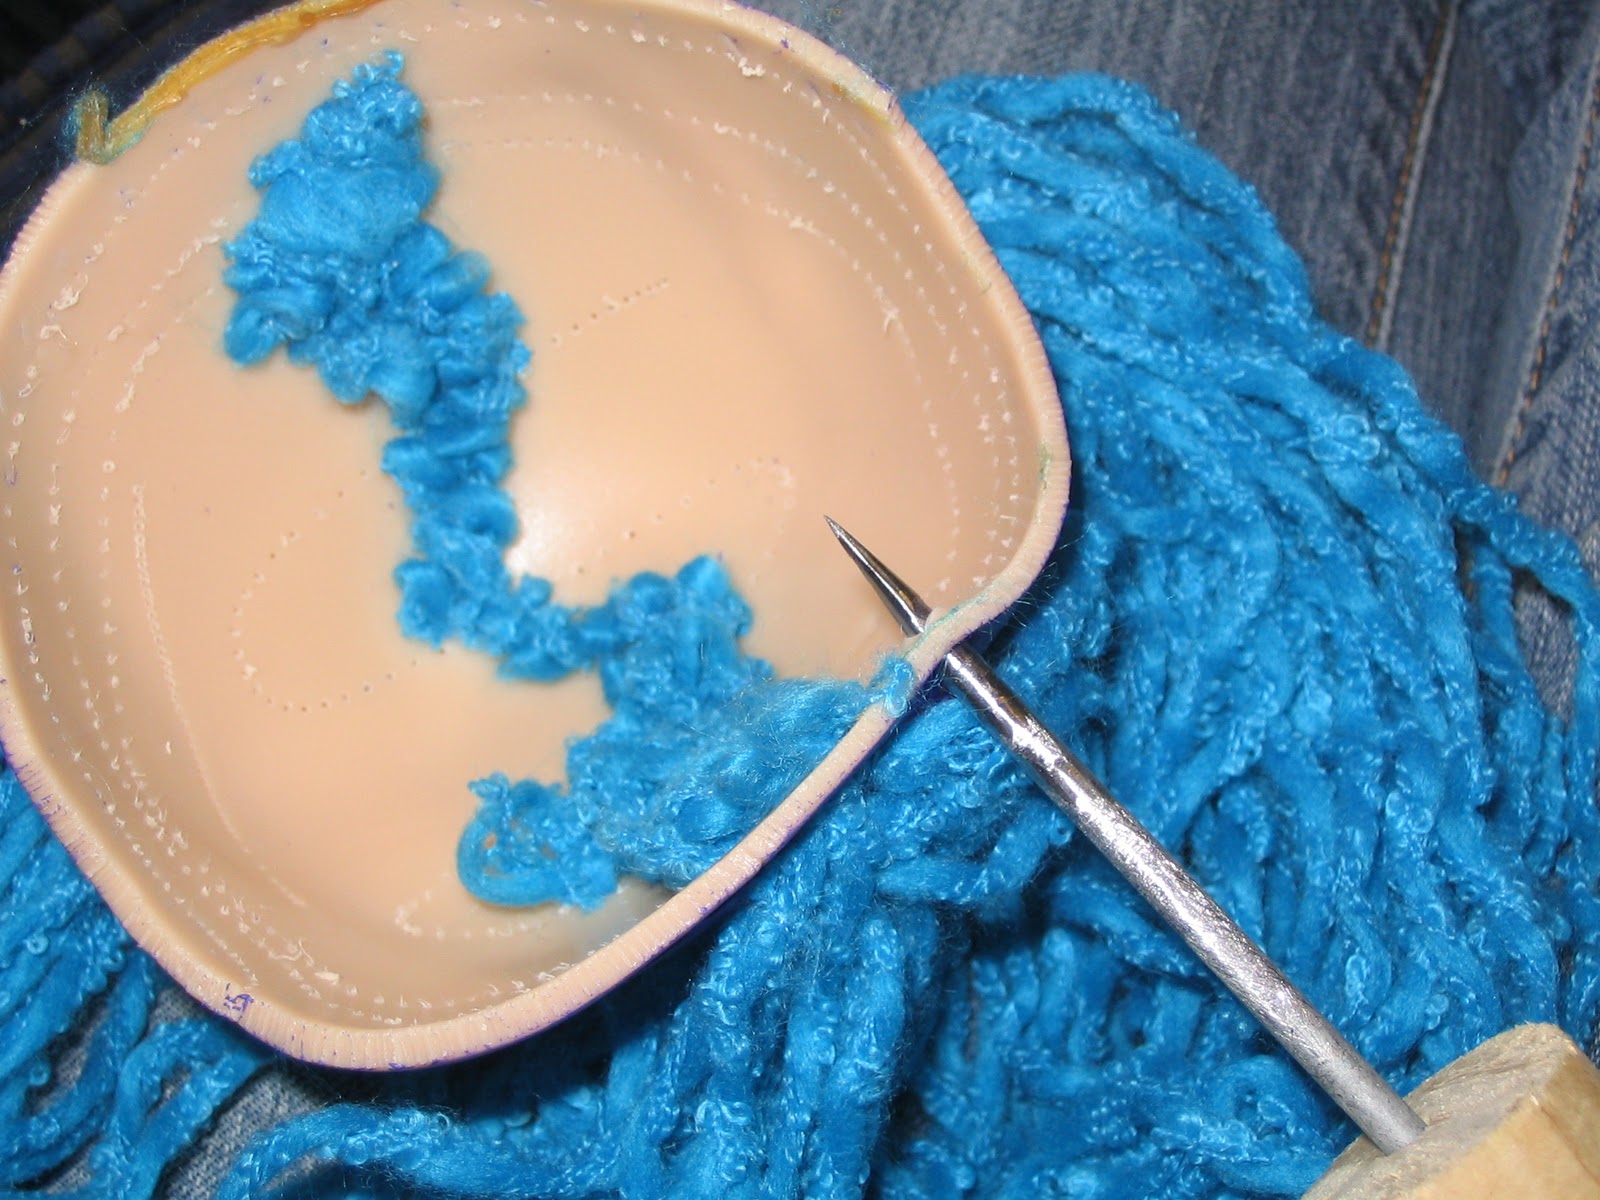
You may also notice my unusual bead sorting tools. A hand- mine actually, a metal coaster, and a gladware container that used to house oregano. I do not own a bead tray. It isn't because I have a moral opposition to bead trays, I quite like them to be honest. I've even gone to my local craft store with the intention of buying one several times. There's just one problem- the store puts the drab, grey, boring bead trays right next to the colorful, gorgeous, enticing beads and charms. When confronted with choosing something useful as opposed to something fabulous, I almost always go with fabulous. Once in a while I get lucky and both are wrapped up in one stunning, useful package. Like my husband. But usually it's one or the other. And I find that very unfair.

Anyway, if you are a planner and you have drawn out your design before beginning your beading extravaganza- good on you! Once in a while, I follow a pattern, but this is not one of those times. So, if you're like me and you're making up your design as you go along- good on you, too! And, it's a good idea to stop every now and again, study what you've done so far, and decide where you want to go next.

I've decided I want to continue with symmetrical elements in my design. Much easier with beading lines rather than drawing them!


This is what the peyote stitch turns into.

Pretty amazing that this doesn't take much time. Well...more than opening a can of coke, but less than cooking a seven course meal or having a baby.


 I'm now at the bottom of the neck, where I want to stop the peyote stitch. So to prepare for the next bit, I string 5 purple beads onto my thread. I'm using smaller beads for this step for several reasons: 1. I like the way the smaller beads curve better, 2. the difference in size sets the pattern apart, and 3. I'm almost out of the larger size, but I have lots of the smaller. Sometimes it's not so much design as bad planning.


 Next, I thread the needle back through the white bead forming a loop with my purple beads.


Then, through the white bead in the row above and the next int eh current row to continue making loops.

 When I've gone around the entire neck with my purple loops, I thread the needle through the first loop coming out at the middle bead.
 Then stop.

This is another "where to from here moment."

If the paint on the body wasn't quite to tatty, I'd probably leave it as is. That looks awesome!

But the fact remains, the paint job is pretty scuzzy, so I must press on.


Notice something strange?

Yeah, that whole lack of planning thing is either biting me in the tuckus, or creating quite a stunning effect.

Lets go with the second option. Because otherwise I have to undo a LOT of work.
 While deciding what my next move should be, I glued the top of the head back on with some seriously strong adhesive.

Looks like Frankenstein. But since it's going to be disguised by hair, I'm not too worried.

By the way, if you've never seen Young Frankenstein, you should be ashamed. Go rent it, watch it, enjoy it...the glue needs at least an hour to cure completely, so I'll wait.
 Funny, huh?

The next row is a version of the one before it. This time, 10 purple, 1 white, 10 purple through the white bead in the row before.
 And again.

You can see the gap in the middle where my screw up lack of planning ingenious design work is really showcased.
And here's how she looks now. I'm a bit stumped as to where I want to go next, but, it's time to make dinner so I don't need to make a decision yet. I can stew over it for hours.

Or, forget about it until tomorrow when I'm more rested and the boy child will be at school.

Saturday, April 2, 2011

Doll: Part 3 of however many it takes to finish her

He loves the beach!


And he made a new friend
Give me a moment to catch my breath. As Saturdays go, this one was... full. An afternoon at the beach, another chicken, wasp sting- Steve not me, and subsequent rush to the pharmacy for some cream to stop the swelling and pain of said sting. Ok, written out, it doesn't sound like a lot, but I feel like I've been full on all day!


Steve made me a new tool, and I'm pretty sure it'll work. I tried it out, and it does seem promising, but I was a bit distracted by other things today.

This is what the tool looks like, and not only should it be useful for making holes to insert strands of yarn for hair, but also a very effective self defense weapon!


But the thing that distracted me today, in addition to beach, chicken, and child, was beads. Which can be seen in that picture right there ------>

My distance vision is, well I wouldn't say I'm blind as a bat. More like, blind as a moose. Moose are very near sighted. Sometimes a moose will like, "Yo Dave! How are ya bud?" But what they think is their friend, is actually a car. Because from far away they can't tell the difference.

It made more sense in my head.

The point is, I'm quite nearsighted, so doing beading work is easy for me. However, if you have a hard time seeing the tiny holes and whatnot, there are tools out there that can help. I found the coolest magnifying glass! It hangs around your neck so you still have both hands free to work, but magnifies what's in your lap so you can see what you're doing. Cool, huh?

I decided that I'm not overly fond of the body of Periwinkle, since it's quite rough. Since the plastic of her body was so shiny, normal acrylic paint wouldn't stick to it. You can buy plastic paint, and chances are you can buy an additive for acrylic paint that will make it stick to plastic. I didn't do that, though. I simply lightly sanded the body so the the paint would have a rough surface to stick to. The reason is that I fully intended to completely cover the body, though with which method, I hadn't yet decided.

Still with me? Cool!

Last night I was struck by sudden genius! It's ok, I'm used to it. Out of the blue a thought gripped me in it's warm grippiness and shouted BEADS! Oooooo... a beaded outfit for Periwinkle!

Now, I can feel your trepidation. You're thinking, "That's too hard!" But oh no it isn't! Beading techniques, while they can be a bit tricky at first, are incredibly easy once you learn how to do the basics.


First step: I put her head back onto her body without the top of her skull... technically, Steve put her head back on. It was a tight fit, and I'm not enough of a feminist to refuse help from a man when it's offered.


 Steve can't help but laugh every time he looks at this. Sometimes he's so immature. I swear I don't have the slightest idea why this is funny.

Nope, not at all.

<smirk>
I'll be using the peyote stitch to form a collar. The beads I'm using are not the best for the peyote stitch because they're not uniform in size or shape. The best seed beads I've found to use are Delicas because they're very uniformed.

But that's ok, we work with what we have.

To begin, run your beading thread through one bead several times so it can't slip up or down the thread. Leave a long tail- at least several inches. The purpose of this bead is to stop all the subsequent beads from falling off. It will be removed later, so the color really doesn't matter.


Next, string enough beads onto your thread to wrap firmly around the neck of your doll. Put the needle back through the first bead to form a loop.

String another bead on your thread, skip one bead from the first row, and thread the needle through the next bead. Continue until you've gone around the entire loop.


This shows the first couple of beads in the second row. The first row are white, the second is blue. You can see how I've alternated the beads.


When you get to the end of the row, run the thread through the bead in the row above, and the first bead of the row you've just finished.


That's all there is to the peyote stitch. It's quite versatile, and in sorting out the beads for this project, I've realized how many red and gold beads I have! Since we here in the southern hemisphere are in autumn, I see an autumn beaded bag in my future!

Friday, April 1, 2011

Doll: Part 2 of however many it takes to finish her

Not a heck of a lot of progress happened today. Fridays are my hellish days, and today was especially so. First stop on the way back from taking my son to school is grocery shopping. Easily the most despicable errand for a stay at home mum. I've tried several things to try to make the task less arduous- listen to music on my ipod (which was stolen and insurance hasn't come through to replace it yet- sorry, sore spot), dressed up- hair, make-up, the whole bit, talked to other mums and their children, pretended to be a super hero spy who needed to gather the specific list of ingredients to make the antidote for the poison that was released into the air over a major metropolitan area and only I was immune to it's affects! Nothing works. It's just a boring task.
It's a rough life.

Anyway, then Steve and I took the dog for a walk up the hill. Steve forced me to take the zig zag track- so dangerous they don't even risk pulling the bodies of hikers who have died from massive coronaries back down the track. Ok, possibly not that bad, but it is steep. And then this afternoon I went on the Fun Run with my son's school. Whoever was sick enough to call it the "Fun Run" obviously has never done it with a slightly smallish boy child who is LAZY! Seriously, he laid down on the footpath (sidewalk for you Americans) so many times I was ready to leave him there! But we did manage to finish, and it only took us an hour.


So, you can probably guess that Periwinkle (just trying it out for now) didn't get a whole lot done. I did decide, however, that the gaping holes for eyes were getting a little too creepy to deal with. The problem has now been rectified:

Much better, don't you think?
 The eyes that were originally in the doll have been saved for future use. I never throw anything away which is probably why my "studio" looks the way it does. That and Steve leaves his paint stuff wherever it happens to be because it's a "studio" only he doesn't use the quotations.

Where was I? Oh right, eyes.

The original eyes were way too busy for the face with the addition of the swirls. So I grabbed some green glass pebbles I had in one of my drawers (the reason for not throwing stuff away). They were perfect in width and depth, but a bit too tall. No worries, I made two small incisions cuts in the plastic around each eye socket to allow the plastic to mould to the new eye. Then, using craft glue, I glued the stones in place.

The glue is still wet in the photo. It dries clear. And strong.

Then, after harvesting the crop from our garden, feeding and cuddling the chickens- so cuddly! I thought I would begin the process of attaching hair to Periwinkle.

I've decided to further the symmetricalness of the swirls with pig tails. Yes, I know that close up the anti-symmetricalness of the swirls is appallingly obvious- so just humour me, k?

One of my favorite styles with pig tails is the zig zag part- so that's what I'm attempting to do. I used the trusty white wax pencil to draw the zig zags down the middle of the crown of the head.


So now you're thinking, "Those are diamonds." And you'd be right! There, don't you feel good about yourself. You should. The reason for drawing diamonds is that it makes it easier to get the pattern even. I eyeball almost everything I do. Not because it's more effective. Not because I enjoy the humanity of imperfection in my creations. It's simply that...well, where do you suppose my son gets his laziness from?

It's important to note that the zig zag pattern really is just a guideline. I know that in order to have a zig zag part, I need that particular area of the head to have plenty of hair so that the girl doesn't have any unsightly bald patches.

Next on the list: devise a way to get the hair in the scalp without crippling myself. With Samantha, I used a leather thimble and an altered needle to push the yarn strands into the head. The result was stunning, but also ended with me having a few holes in my thumb and a fair amount of bruising as well. Plus, I started using my embroidery scissors to my a hole, which is incredibly bad for them and now they're quite dull. I'm much more upset about the scissors than my thumb, since thumbs heal, scissors don't. But I wasn't really thinking about that when I couldn't bend my thumb and it was swollen and throbbing. So this time I'm being smart! I'm going to use an ice pick to make the initial hole.

We don't own an ice pick and I've tried in vain for almost 4 years since moving to New Zealand to find one. I'm not really sure what New Zealanders do to separate ice, but I suspect it involves a hammer.

We do have a hammer. Several, in fact. And nails. So I got this great idea to use a nail and hammer to make the holes I need. I was even smart enough to use a longish nail so that I didn't have as big a risk of smacking my fingers.


So the current plan is: Steve will sharpen a stainless steel nail and attach it to a wooden handle for me, and we'll pray that it's an ingenious contraption that everyone will want.

Meanwhile, I will enjoy my scotch, while I decide if I want to work on a different project, or play solitaire on my computer.

These are the truly important decisions in life.